---
url: https://sugarat.top/technology/works/codeNote.md
---
# 组装个支持记笔记的CodePen
## 前言
emmm。。。,有好长一段时间没码文了(近几个月实在是太忙了),这个玩具刚好是这两周抽空`拼`的拿出来和大家分享一下
朋友最近刚学前端,经常问一些问题,通过聊天软件发代码和贴图实在是不太方便,就给它推荐了[CodePen](https://codepen.io/) 和 [🐴上掘金](https://code.juejin.cn/)
前者国内访问实在不稳定,后者emm有个内容审核,导致内容`实时性`较差。
就搜了搜GitHub上有不有类似的项目,搜了一圈还真有不少,这里贴两个感觉不错的 [CodeRun](https://wanglin2.github.io/code-run-online/#/) 和 [CodePan](https://codepan.egoist.sh/)
朋友使用后反馈,问了问有不有啥支持直接在旁边 **写笔记**,**贴图片(这个)**,方便做记录
emm...,检索了一圈记忆中除了 `VsCode` 好像还真没有这种东西(可能是我孤陋寡闻了,读者有推荐的可以评论区补充)
那就给他造个吧,练练手,有段时间没写自己的代码了
等不及了?先体验体验👉🏻 [示例1:应用首页](https://code.sugarat.top),[示例2:分享代码](https://code.sugarat.top/share/63035c10a6ea447087355f55)
## 技术选型
行动肯定是要站在巨人的"键盘上"(手滑打错了,那就这样吧),先看看有哪些可用的 "零件"
### 内容编辑器
先是写笔记部分,挑了几个库玩了一下
* [wangEditor](https://www.wangeditor.com/) - 开源 Web 富文本编辑器,开箱即用,配置简单
* [prosemirror](https://prosemirror.net/) - 支持部分MarkDown语法,可拓展定制的富文本编辑器
* [🧴 Lotion](https://lotion.dashibase.com/) - 基于Vue3开发的块编辑器
* [Editor.js](https://editorjs.io/) - 官方:"Next generation block styled editor.",下一代块编辑器
因为屏幕中需要展示 笔记/代码/预览 3个部分,直接使用markdown语法会有个切换的动作(这里就不考虑markdown格式做编辑了)
上述的几个库分大体上分为两类`富文本编辑器`,`块编辑器`
| 富文本编辑器 | 块编辑器 |
| :-------------------------------------------------------------------------: | :-------------------------------------------------------------------------: |
| 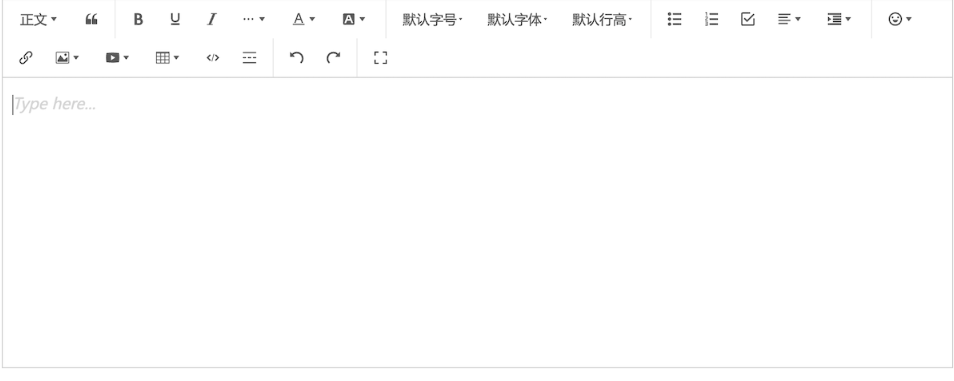 | 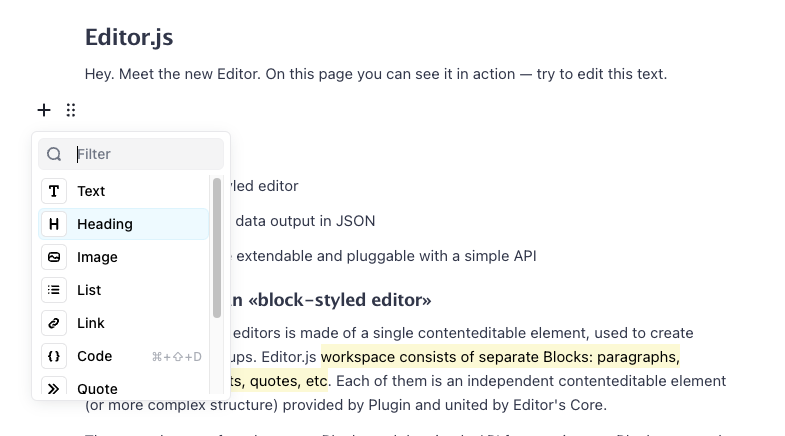 |
前者是比较传统的编辑器,后者从社区反应来看像是`下一代趋势`,但国内好像还没看到使用此方案的成熟产品(可能是我孤陋寡闻了,读者有推荐的可以评论区补充)
最后本着技术尝鲜(喜欢折腾)的精神选了[Editor.js](https://editorjs.io/),官方提供了一系列的基础插件,提供了简单的API支持自定义的插件(后面单独开文章介绍)
### 代码编辑器
这个就[monaco-editor](https://github.com/microsoft/monaco-editor) 没得跑了
不过在使用之前先看了一下最近阿里开源的[OpenSumi](https://opensumi.com/zh),看之前以为是个可直接用的`NPM`包,文档翻了半天,只给了个demo,emm 拉下来,果然如官方预料 卡在了 `yarn install`,感觉有一定上手成本,先不看了
### 后端部分
思考了一下都是简单的`CRUD`场景,存储和鉴权`MongoDB`与`Redis`感觉就够了(也没有配置成本,安装即用)
服务端框架部分就直接拿自己的之前写的玩具[flash-wolves](https://github.com/ATQQ/flash-wolves)开整
接下来就是组装了
## 实现
### 项目搭建
粗糙的原型图如下
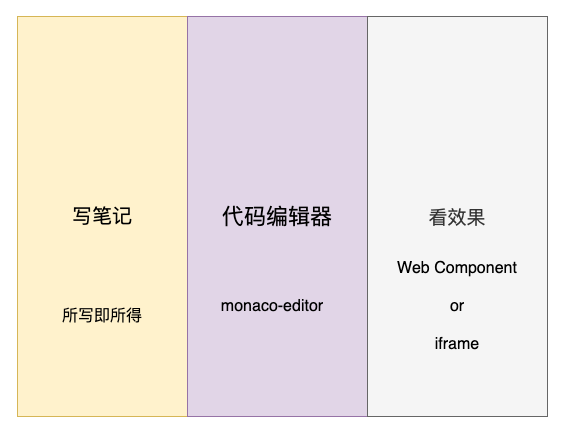
布局也比较简单
```html
hello world
',
language: 'html',
theme: 'vs-dark',
fontSize: 18,
automaticLayout: true
}
)
// 如果数据是异步从接口拿,那么可以调用setValue方法,设置内容
setTimeout(() => {
htmlEditor.setValue('hello world
')
}, 2000);
// 在这个方法监听编辑器的内容变动
htmlEditor.onDidChangeModelContent(() => {
const newValue = htmlEditor.getValue()
})
```
通过上述`3`个简单的方法即可实现1个简单编辑器的内容读写
当然笔者这里用的Vite + Vue3,**这里还有几个坑**
导入worker,参考[尤大给的示例](https://github.com/vitejs/vite/discussions/1791#discussioncomment-321046)
>
```ts
// main.ts
import EditorWorker from 'monaco-editor/esm/vs/editor/editor.worker?worker'
import JSONWorker from 'monaco-editor/esm/vs/language/json/json.worker?worker'
import CSSWorker from 'monaco-editor/esm/vs/language/css/css.worker?worker'
import HTMLWorker from 'monaco-editor/esm/vs/language/html/html.worker?worker'
import TSWorker from 'monaco-editor/esm/vs/language/typescript/ts.worker?worker'
self.MonacoEnvironment = {
getWorker(_: any, label: string) {
if (label === 'json') {
return new JSONWorker()
}
if (label === 'css' || label === 'scss' || label === 'less') {
return new CSSWorker()
}
if (label === 'html' || label === 'handlebars' || label === 'razor') {
return new HTMLWorker()
}
if (label === 'typescript' || label === 'javascript') {
return new TSWorker()
}
return new EditorWorker()
}
}
```
editor使用ref绑定调用的时候需要toRaw,不然应用就会卡死
```ts
const htmlEditor = ref(null as any)
// 根据props更新
watchEffect(() => {
if (htmlEditor.value && props.html) {
toRaw(htmlEditor.value).setValue(props.html)
}
})
onMounted(()=>{
// 初始化实例
htmlEditor.value = monaco.editor.create({...ops})
toRaw(htmlEditor.value).onDidChangeModelContent(() => {
console.log(toRaw(htmlEditor.value).getValue())
})
})
```
### 代码渲染
这里使用`iframe`承载内容,期望iframe里页面最终结构如下
```html
```
其中 [eruda](https://github.com/liriliri/eruda) 主要用于展示 iframe 页面的 log 日志信息、 Dom 结构等,避免打开Chrome DevTools
所有dom的创建均通过 Dom API 完成
**在线预览示例代码效果:https://code.sugarat.top/share/6312ffa045a77f0bc4b881dc**
下面简单过一下实现的代码
先给iframe搞个样式,避免看不到
```html
```
然后来3个dom承载我们的`三剑客`代码
```ts
// 一系列用户编写的代码
const cssCode = `h1{
color:red;
}`;
const htmlCode = `hello world
`;
const jsCode = `console.log("hello world")`;
// 3个dom
const $style = document.createElement("style");
$style.innerHTML = cssCode;
const $html = document.createElement("div");
$html.innerHTML = htmlCode;
const $userScript = document.createElement("script");
$userScript.textContent = jsCode;
```
紧接着创建`iframe`将其装进去 就okk了
```ts
const $iframe = document.createElement("iframe");
$iframe.addEventListener("load", () => {
$iframe.contentDocument?.head.append($style);
$iframe.contentDocument.body.append($html, $userScript);
});
document.body.append($iframe);
```
如果要引入eruda,咱们需要先等eruda加载完再插入咱们得`script`,不然捕获不到代码`console`
详细如下
```ts
$iframe.addEventListener("load", () => {
$iframe.contentDocument.head.append($style);
// eruda cdn资源
const $eruda = document.createElement("script");
$eruda.src = "//cdn.jsdelivr.net/npm/eruda";
// 打开面板的代码
const debugExec = document.createElement("script");
debugExec.textContent = `window.eruda.init({
defaults: {
displaySize: 25,
transparency: 0.9,
}
})
eruda.show()
`;
$iframe.contentDocument?.body.append($eruda);
// eruda 加载完再加载HTML与用户脚本
$eruda.onload = function () {
$iframe.contentDocument?.body.append(debugExec, $html, $userScript);
};
});
```
### 代码格式化
写完代码后,格式化是很有必要的,避免乱糟糟
笔者这里直接采用`prettier`,啥都提供好了,CV一下就能用
出参入参都比较简单
```ts
import prettier from 'prettier/standalone'
import htmlPlugin from 'prettier/parser-html'
import cssPlugin from 'prettier/parser-postcss'
import jsPlugin from 'prettier/parser-babel'
export function formatHTML(html: string) {
return prettier.format(html, {
parser: 'html',
plugins: [htmlPlugin]
})
}
export function formatJS(tsCode: string) {
return prettier.format(tsCode, {
parser: 'babel',
plugins: [jsPlugin]
})
}
export function formatCSS(css: string) {
return prettier.format(css, {
parser: 'css',
plugins: [cssPlugin]
})
}
```
到这里构成应用的几个主要`开源库`的使用介绍差不多完了
`前人栽树后人乘凉`,对UI/UE要求不高的时候,拼凑出一个新的应用花费时间不高
当有一丝想法的时候,得及时抓住。
## 最后
`EditorJS`还是有很大的可玩性,后面有机会围绕输出一些插件实践,试着整个编辑器替代日常的Markdown
这个在线的Code也会在后续中会把一些想法迭代进去,目前看主要是代码编辑部分不太友好(代码提示这一块),访问了其它的在线编码的,基本都有这个问题(无论怎么搞都达不到本地VS Code的地步)
后面准备另辟蹊径搞一搞,先把Web版的交互优化一下下
**三连破X,更新下一期(手动滑稽)**
读者对其它实现细节感兴趣的话,可以[试玩后](https://code.sugarat.top/),评论区留言,下一期送上解读
项目完整源码见[GitHub](https://github.com/ATQQ/onlineDemoEditor)
*-------------华丽的分割线------------*
成签约作者了,后面几个月输出可能会稍微频繁一点了,到时候就打扰了,大家不要吝啬3连