
模板工程搭建:Vue-Cli搭建Vue3/TS/uni-app小程序工程(中)
前言
上一期已经搭建了一个初步可用的uni-vue3-ts工程化模板
已经包含了Vue3,TS,Sass,Vant Weapp等特性
本节将为模板接入更多的特性:
- eslint
- vuex4
- mini-axios
eslint
通过接入eslint,可以约束开发人员的编码风格,便于统一一个团队中成员的开发风格
配合vs code中的eslint插件,可以实现自动根据配置的规则进行format
yarn add eslint --dev然后在package.json中添加脚本
{
  "scripts": {
    "eslint:init": "eslint --init"
  }
}
执行脚本
yarn eslint:init根据提示,按照个人喜好选择一些特性
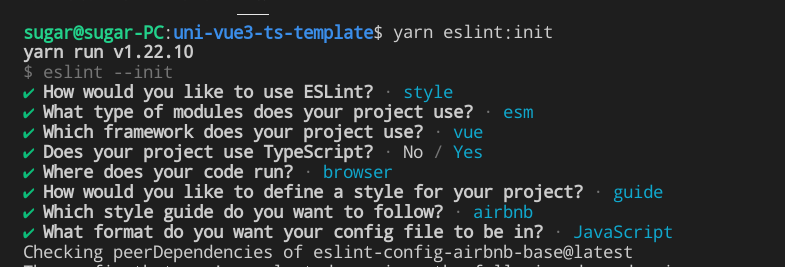
静静等待一会儿就安装好所有依赖,然后会自动在根目录下生成eslintrc.js配置文件
配置文件内容如下,将plugin:vue/essential改成plugin:vue/vue3-essential
module.exports = {
  env: {
    browser: true,
    es2021: true,
  },
  extends: ['plugin:vue/vue3-essential', 'airbnb-base'],
  parserOptions: {
    ecmaVersion: 12,
    parser: '@typescript-eslint/parser',
    sourceType: 'module',
  },
  plugins: ['vue', '@typescript-eslint'],
  rules: {},
};添加.eslintignore文件,忽略一些不检查格式的文件或目录
dist在package.json中添加自动lint 指令
{
  "scripts": {
    "lint": "eslint --fix --ext .js,.jsx,.ts,.vue ./src",
  }
}
执行自动lint
yarn lintvuex
必不可少的状态管理工具
模板中默认依赖的是3.2.0版本,即Vuex3,咱们这里用Vuex4(专为Vue3打造)
yarn add vuex@next --save下面编写一个实际的demo来测试
目录结构
首先在src下创建store目录
采用模块化的方式,将同一业务/页面的 store 存在同一个namespace下
目录结构如下:
src/store
├── index.ts
└── modules
   └── test.ts
每个模块都存放在modules中
通过index.ts将这些模块引入,然后统一对外导出
示例模块编写
包含 state,getters,mutations,actions四个部分
使用TS编写的化能够获得非常友好的编写提示
src/store/modules/test.ts
import { Module } from 'vuex';

interface State {
  count: number;
}

const store: Module<State, unknown> = {
  namespaced: true,
  state() {
    return {
      count: 0,
    };
  },
  getters: {
    isEven(state) {
      return state.count % 2 === 0;
    },
  },
  // 只能同步
  mutations: {
    increase(state, num = 1) {
      state.count += num;
    },
    decrease(state) {
      state.count -= 1;
    },
  },
  // 支持异步,可以考虑引入API
  actions: {
    increase(context, payload) {
      setTimeout(() => {
        context.commit('increase', payload);
      }, 1000);
    },
  },
};

export default store;
示例模块的使用
在store/index.ts文件中统一引入上述定义的store模块,并通过createStore创建store实例
src/store/index.ts
import { createStore } from 'vuex';
import test from './modules/test';

// Create a new store instance.
const store = createStore({
  modules: {
    m1: test,
  },
});

export default store;在main.ts中直接使用这个 store 即可
import { createApp } from 'vue';
import App from './App.vue';
// 引入store
import store from './store/index';

const app = createApp(App);

// 在Vue上注册
app.use(store);

app.mount('#app');
示例组件编写
利用上面编写的 modules/test store模块编写一个组件调用
代码中的m1,是上面store/index.ts在引入的时候设置的别名
组件如下src/components/VuexDemo.vue
<template>
<view class="vuex-demo">
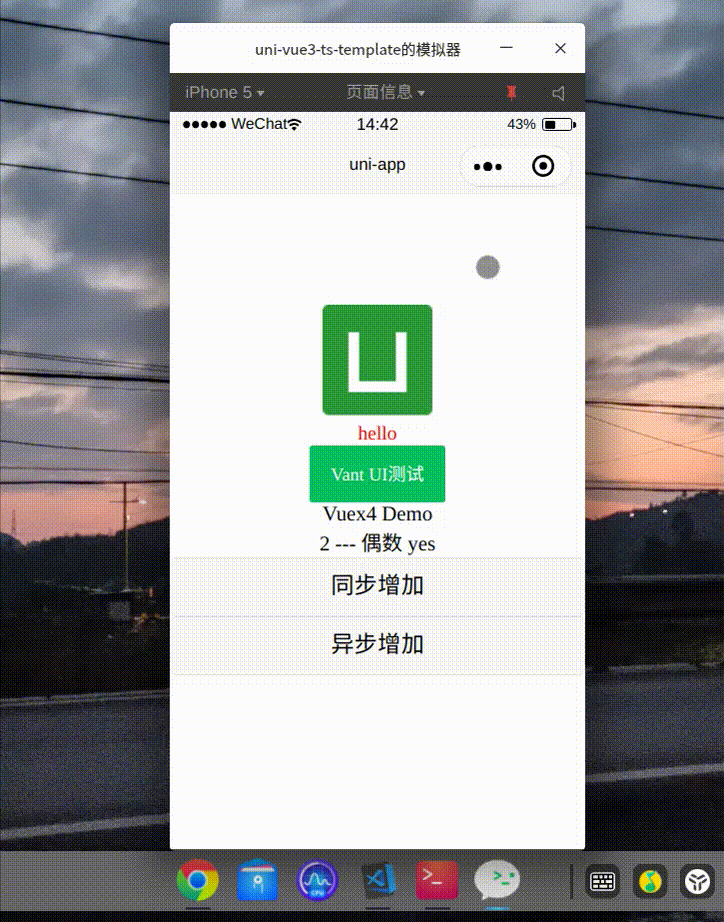
<text>{{ count }} --- 偶数 {{ isEven ? 'yes' : 'no' }}</text>
<view>
<view><button @click="synIncrease">同步增加</button></view>
<view><button @click="asyncIncrease">异步增加</button></view>
</view>
</view>
</template>
<script lang="ts">
import { computed, defineComponent } from 'vue';
import { useStore } from 'vuex';
export default defineComponent({
setup() {
const $store = useStore();
// 获取state
const count = computed(() => $store.state.m1.count);
// 获取getters
const isEven = computed(() => $store.getters['m1/isEven']);
// 调用同步方法(mutations)
const synIncrease = () => $store.commit('m1/increase');
// 调用异步方法(actions)
const asyncIncrease = () => $store.dispatch('m1/increase');
return {
count,
isEven,
synIncrease,
asyncIncrease,
};
},
});
</script>
<style>
.vuex-demo {
text-align: center;
}
</style>效果
Axios
由于axios只兼容Node与Web两端,在uni-app中无法直接使用,uni-app 收口的网络请求方法是 uni.request
调研找到一个根据Axios API风格,封装的uni-app可用的请求库axios-miniprogram
这里限制一下版本,经测试最新的版本还存在一些小问题,无法正常使用
yarn add axios-miniprogram@1.3.0下面介绍一下封装这个库的过程
目录结构
在 src 下创建 api 目录,在 api 目录下创建 http.ts,index.ts,modules
src/api
├── http.ts			# 封装的调用方法
├── index.ts		# 对外统一暴露各个业务模块的接口调用方法
└── modules
   └── user.ts		# user模块的接口调用方法
http.ts
其中请求的baseURL通过环境变量配置文件(.env)注入
.env
VUE_APP_AXIOS_BASEURL=http://localhost:3000为axios注册请求/响应拦截器,设置默认请求头
在请求拦截器中添加鉴权身份令牌,响应拦截器中根据返回的状态做进一步处理(统一的警告弹窗,权限校验)
import axios from 'axios-miniprogram';

const http = axios;

// 请求base路径
http.defaults.baseURL = process.env.AXIOS_BASEURL;
http.defaults.headers = {
  'content-Type': 'application/json',
};

http.interceptors.request.use(
  (config) => {
    // 所有请求都携带token
    Object.assign(config.headers, {
      token: uni.getStorageSync('token'),
    });
    // 发送之前操作config
    return config;
  },
  (err) => {
    if (err.status !== 200) {
      // 处理错误
    }
    return Promise.reject(err);
  },
);

/**
 * 响应拦截
 */
http.interceptors.response.use(
  (response: any) => {
    // 对拿到的数据做一些额外操作操作 (如无权限,直接跳转首页)
    const { code, msg } = response.data;
    if (code !== 0) {
      if (msg) {
        uni.showToast({
          title: msg,
        });
      }
      // 走catch逻辑
      return Promise.reject(response.data);
    }
    // 返回前操作
    return response.data;
  },
  (err) => Promise.reject(err),
);

export default http;
接口模块化
modules目录下主要编写各个业务模块请求方法
例如modules/user.ts
import http from '../http';

function login(account: string, pwd: string) {
  return http.post('user/login', {
    account,
    pwd,
  });
}

export default {
  login,
};通过api/index.ts统一对业务方暴露
export { default as userApi } from './modules/user';业务调用
<script lang="ts">
import { defineComponent } from 'vue';
import { userApi } from '@/api';

export default defineComponent({
  setup() {
    const handleHttp = () => {
      userApi.login('account', '123456')
        .then((res) => {
          console.log(res);
        }).catch((err) => {
          console.log(err);
        });
    };
    return {
      handleHttp,
    };
  },
});
</script>
未完待续
- tailwindcss
- less
- 其余成熟UI库
- 。。。and more