
实践:给女朋友个性化定制应用-体重记录(一)
此系列的目的是帮助前端新人,熟悉现代前端工程化开发方式与相关技术的使用,普及一些通识内容
本文涉及内容
提升阅读体验,文章将会分为多节发布,本节主要阐述前端部分
- 初始化Vue3+Vite+TS项目
- VantUI组件库引入
- 移动端适配
- 自定义组件开发
- @vue/compiler-sfc
- 彩色字体图标的使用
背景
女朋友天天都在念叨:"我又胖了,怎么不吃东西也没见轻"
为了记录每次体重数据的变化,就下载了记录体重的App,用了几个都不太满意(主要是不满意数据反映出的图表内容)
于是乎咱就拿出键盘⌨🖰就给她打造一个独一无二的
需求
长话短说:
- 基本的体重记录(CRUD)
- 多样化的数据统计报表
- 反应每一次的变化
- 最后一次与当天的第一次的比较
- 指定时间区间里的变化
- ...more
技术方案
明确了目标用户与用户诉求后,接下来直接定技术方案
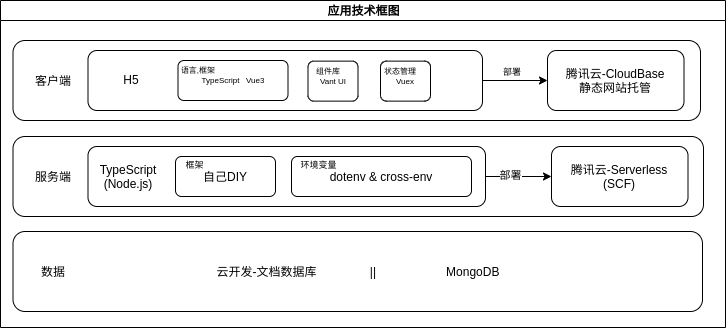
应用形式:H5(移动到Web应用)
前端
- 框架:Vue3
- 语言:TypeScript
- 构建工具:Vite2
- 组件:Vant UI
- 网络:Axios
- CSS预处理:Sass
后端
- Node.js + TypeScript
- 数据库:菲关系型数据库(MongoDB或云开发用文档数据库)
部署
均使用Serverless服务部署,性能好又便宜
- 后端:腾讯云Serverless应用
- 前端:腾讯云开发-静态资源托管,这部分教程戳此查看
概览
开发准备
项目初始化
直接使用搭建的ATQQ/vite-vue3-template模板初始化项目
引入Vant UI
添加依赖
yarn add vant@next配置按需引入
// vite.config.ts
import { defineConfig } from 'vite'
import vue from '@vitejs/plugin-vue'
import styleImport from 'vite-plugin-style-import'

// https://vitejs.dev/config/
export default defineConfig({
  plugins: [
    vue(),
    styleImport({
      libs: [
        {
          libraryName: 'vant',
          esModule: true,
          resolveStyle: (name) => `vant/es/${name}/style`,
        },
      ],
    }),
  ]
})// src/utils/vantUI.ts
import { App } from '@vue/runtime-core'
// 按需引入
import { Button } from 'vant'
const conponents = [Button]
export default function mountVantUI(app: App<Element>) {
conponents.forEach((c) => {
app.component(c.name, c)
})
}页面
一期预计4个页面:
- 首页
- 登录
- 功能面板
- 体重记录
快速建立好4个页面的模板
# src/pages/
├── 404           # 404
|  └── index.vue
├── dashboard     # 功能面板
|  └── index.vue
├── funcs
|  └── weight     # 体重记录
|     └── index.vue
├── home          # 首页
|  └── index.vue
└── login         # 登录页
   └── index.vue

directory: 6 file: 5
路由配置
页面确定后,配置一下页面路由
src/router/routes/index.ts
import { RouteRecordRaw } from 'vue-router'
import Home from '../../pages/home/index.vue'

const NotFind = () => import('../../pages/404/index.vue')
const Login = () => import('../../pages/login/index.vue')
const DashBoard = () => import('../../pages/dashboard/index.vue')
const Weight = () => import('../../pages/funcs/weight/index.vue')

const routes: RouteRecordRaw[] = [
  { path: '/:pathMatch(.*)*', name: 'NotFound', component: NotFind },
  {
    path: '/',
    name: 'index',
    component: Home,
  },
  {
    path: '/login',
    name: 'login',
    component: Login,
  },
  {
    path: '/dashboard',
    name: 'dashboard',
    component: DashBoard,
  },
  {
    path: '/funs/weight',
    name: 'weight',
    component: Weight,
  },
]

export default routes将顶层的router-view组件放在App.vue中
src/App.vue
<template>
  <div class="app">
    <router-view></router-view>
  </div>
</template>
移动端适配
首先在html模板中添加一句
<meta name="viewport" content="width=device-width, initial-scale=1.0" />尺寸单位使用rem方案,设计稿按375来定
通过调研现有的响应式网站与模拟器中实测,尺寸主要由320,360,375,414四种,得出以下结果:
- html根元素字体大小
- 320:12px
- 360:13.5px = 360/320*12
- 375:14.0625px = 375/320*12
- 414:沿用375方案
于是乎可以直接使用 媒体查询 处理单位的设置
在App.vue中加入得出的如下代码:
<style>
@media screen and (min-width: 320px) {
  html {
    font-size: 12px;
  }
}
@media screen and (min-width: 360px) {
  html {
    font-size: 13.5px;
  }
}
@media screen and (min-width: 375px) {
  html {
    font-size: 14.0625px;
  }
}
</style>
注意:由于样式权重一样的情况下,会采用后定义的内容,所以大尺寸媒体查询代码的放在后面
TODO:补样式权重计算文章
不排除用户电脑访问应用的情况,为提升用户体验,将顶层容器标签固定为414px
在App.vue中加入如下代码:
<style scoped>
.app {
  max-width: 414px;
  margin: 0 auto;
}
</style>
页面开发
准备工作基本完成后就开始糊页面
由于糊页面是个体力活儿,没有营养,文中只贴一些关键代码,完成代码,去仓库探索
页面使用@vue/compiler-sfc方案,开发提效,代码更直观
使用的渐变色来源:webgradients
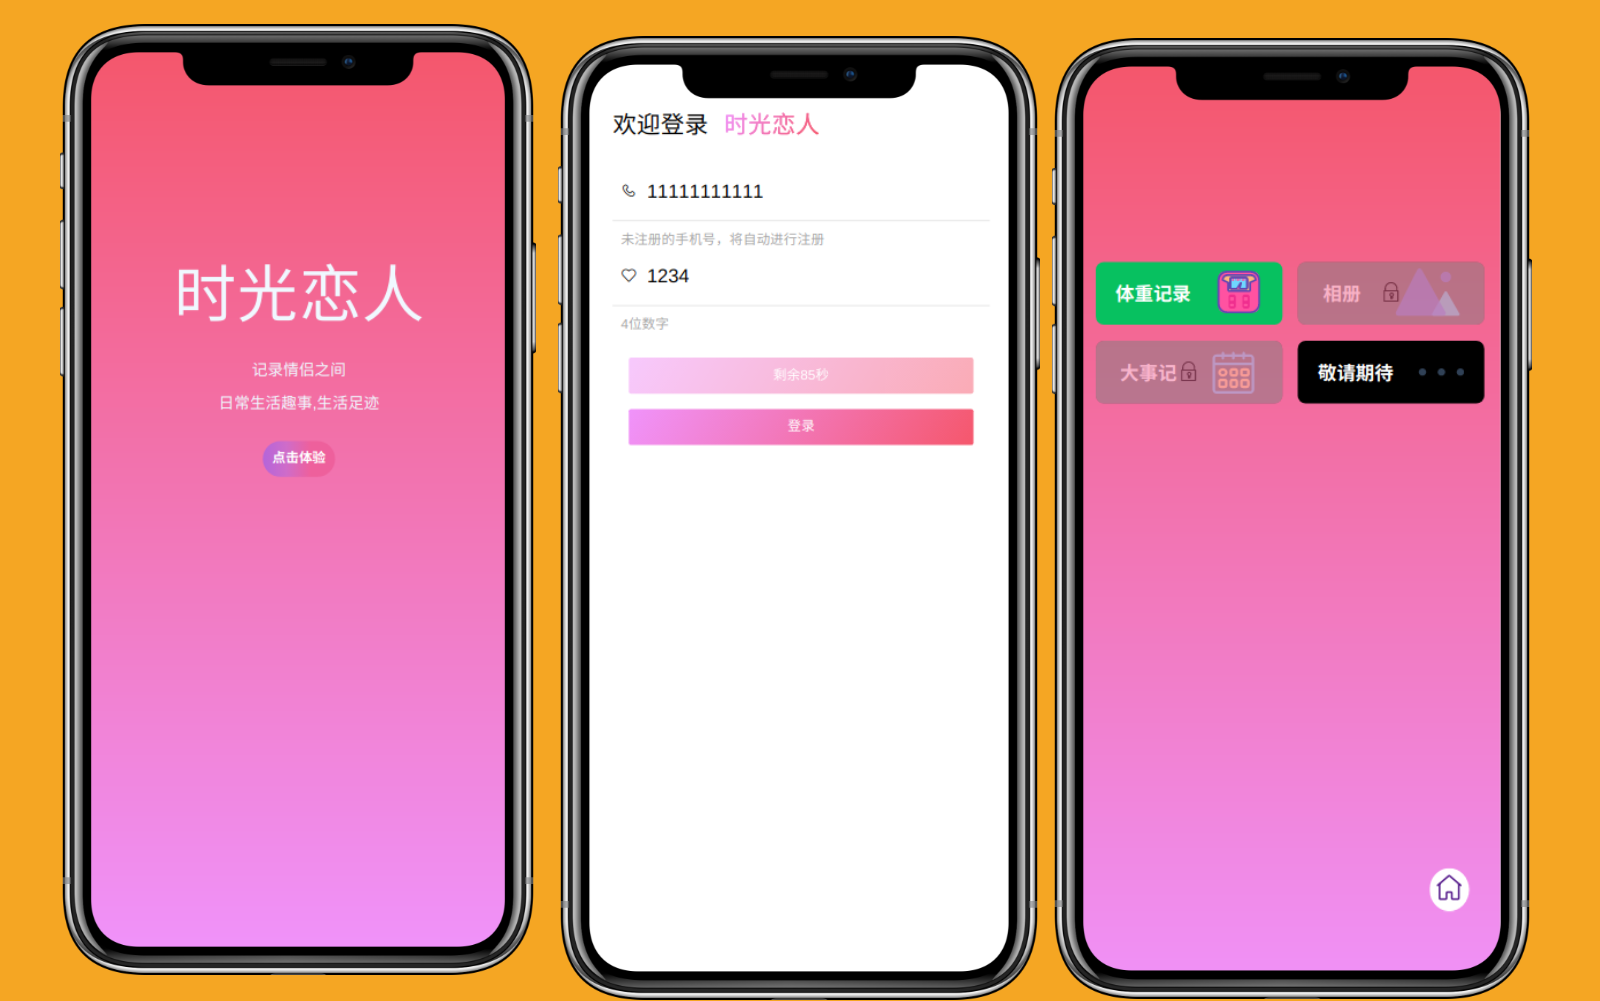
首页
页面整体上只包含应用名,简介,导航登录3部分
<template>
  <div class="home">
    <h1 class="title">时光恋人</h1>
    <!-- 简介 -->
    <section class="introduce">
      <p v-for="(item, index) in introduces" :key="index">{{ item }}</p>
    </section>
    <section class="introduce">
      <p>
        <router-link to="/login">
          <van-button size="small" round :color="loginColor">点击体验</van-button>
        </router-link>
      </p>
    </section>
  </div>
</template>
<script lang="ts" setup>
import { reactive } from 'vue'

const introduces: string[] = reactive(['记录情侣之间', '日常生活趣事,生活足迹'])
const loginColor = 'linear-gradient(to right, #b8cbb8 0%, #b8cbb8 0%, #b465da 0%, #cf6cc9 33%, #ee609c 66%, #ee609c 100%)'
</script>
登录页
避免繁琐的注册流程,直接使用短信验证码登录方案
这个页面开发了一个自定义的 Input 组件
效果如下,包含icon,输入区域,输入提示,注意提示4部分内容

Dom结构如下
<template>
  <div class="under-input">
    <van-icon class="icon" v-if="icon" :name="icon" />
    <input
      :maxlength="maxLength"
      :placeholder="placeholder"
      :type="type"
      :value="modelValue"
      @input="handleInput"
    />
  </div>
  <p v-if="tips" class="tips">
    {{ tips }}
  </p>
</template>
输入内容使用简单的正则进行校验
// 手机号
export const rMobile = /^[1]\d{10}$/
// 验证码
export const rCode = /\d{4}/
功能页
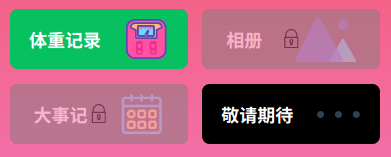
调研了一些类似的应用,最终选择采用卡片的形式展现各个功能入口
卡片组件主要包含功能介绍与彩色图标两部分,效果如下
Dom结构如下:
<template>
  <div
    class="fun-card"
    :class="{
      disabled,
    }"
  >
    <div>
      <h1 class="title">{{ title }}</h1>
    </div>
    <span v-if="icon" :class="[icon]" class="iconfont icon"></span>
    <!-- lock -->
    <div v-if="disabled" class="lock">
      <span class="icon-lockclosed iconfont"> </span>
    </div>
  </div>
</template>
彩色字体图标
- 彩色图标使用
iconfont - 项目中引入步骤
只需要简单的在模板中引入css资源,使用的时候直接书写class即可
<!-- index.html -->
<link rel="stylesheet" href="//at.alicdn.com/t/font_2609471_9womj4g1e15.css"><!-- 使用图标 -->
<span class="icon-lockclosed iconfont"> </span>本期效果
- 线上预览地址