
从0-1实现文件下载CLI工具
本文为稀土掘金技术社区首发签约文章,14天内禁止转载,14天后未获授权禁止转载,侵权必究!
前言
在日常学习/生活中,下载资源时,大部分情况是通过别人分享的资源站点,找到下载入口然后触发下载。
当资源通过url传播的时候,一般也是直接打开,通过浏览器触发下载。
资深的冲浪选手,一般会用一些客户端工具(还记得Win上的各种下载器),Mac上笔者有时候会使用 NeatDownloadManager,无 🪜 时也能拥有不错的下载速度
Coder们用命令行下载文件的方式就很多了,比如最常使用的内置库 curl
下面是最常用的拉取资源的例子
# 链接是第三方服务缩短后的
# -L 参数表明自动对资源进行重定向
curl -L http://mtw.so/5YIGGb -o 码上掘金logo.image

# 通过管道
curl -L http://mtw.so/6647Rc >码上掘金logo.image

# 原图链接 https://p6-juejin.byteimg.com/tos-cn-i-k3u1fbpfcp/759e2aa805c0461b840e0f0f09ed05fa~tplv-k3u1fbpfcp-zoom-1.image
当然 curl 也支持上传下载,以及多种传输协议,具体用法这里就不展开了,感兴趣的读者可以前往Quick Reference: Curl 备忘清单 进一步了解。
本文从 0-1 使用Node实现一个 url文件下载 工具,读者可以收获包含但不限于如下知识点,
Node实现下载文件,如何通过Proxy(🪜)代理下载资源,通用的Node本地持久化存储方法,fs/path/http等模块的常见用法等。
对包含文件下载场景的CLI提供一个实践参考。
下面是简单的使用演示,对实现感兴趣的读者可以接着往下阅读
npx efst http://mtw.so/66eO7c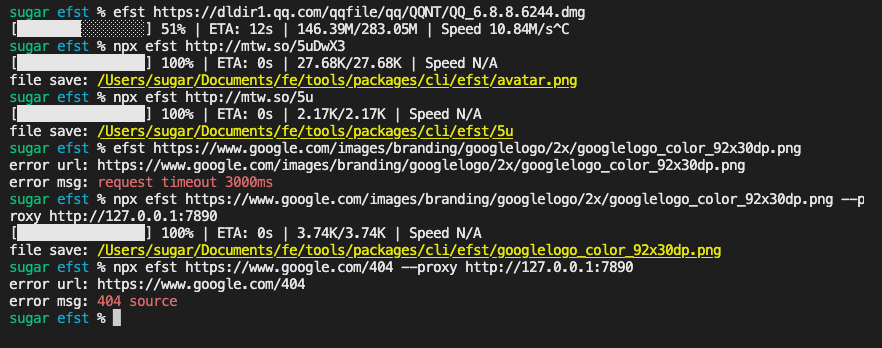
url资源下载
先是纯 url资源下载 的场景,本小节将详细展开相关小功能的实现。
Node原生实现
基于读写流操作,可以看到代码还是十分的简洁
import https from 'https'
import fs from 'fs'
import path from 'path'
function downloadByUrl(url: string, filename?: string) {
const filepath = path.resolve(filename || randomName())
https.get(url, (response) => {
// 创建1个可写流
const writeStream = fs.createWriteStream(filepath)
response.pipe(writeStream).on('close', () => {
console.log(`file save to ${filepath}`)
})
})
}
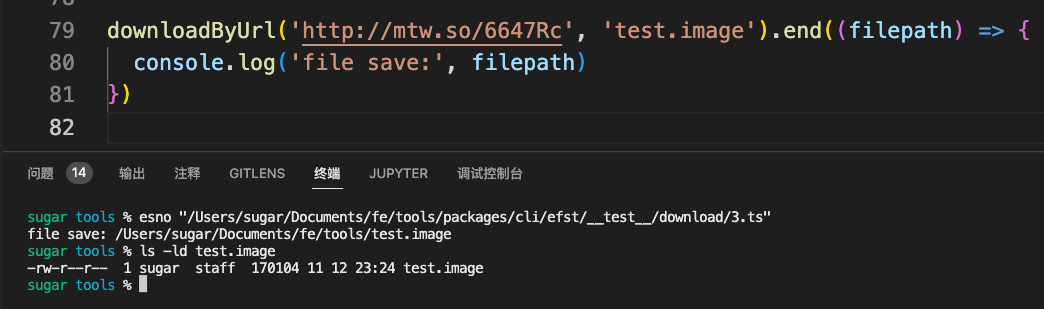
// sourceUrl 为前面的原图链接
downloadByUrl(sourceUrl,'test.image')
下载进度获取
大一点的文件肯定无法实现秒下载,需要获取一下进度,了解现在下载了多少
资源的总大小可以一般可以通过response headers中的content-length字段获取
const sumSize = +response.headers['content-length']流的传输进度可以通过on data事件间接获取
在不通过response.setEncoding(BufferEncoding)修改的编码时,chunk默认是Buffer类型
let receive = 0
response.on('data', (chunk: Buffer) => {
  receive += chunk.length
  const percentage = receive / sumSize
})到此进度percentage就可以获取到了
对上面的方法进行稍加改造,增加progress,end两个方法(支持链式调用的丐版实现)
function downloadByUrl(url: string, filename?: string) {
  let receive = 0

  // 支持链式调用相关逻辑
  let progressFn: (cur: number, rec: number, sum: number) => void
  let endFn: (filepath: string) => void

  const thisArg = {
    progress: (fn: typeof progressFn) => {
      progressFn = fn
      return thisArg
    },
    end: (fn: typeof endFn) => {
      endFn = fn
      return thisArg
    }
  }

  https.get(url, (response) => {
    // 输出文件路径
    const filepath = path.resolve(filename || randomName())
    // 创建一个可写流
    const writeStream = fs.createWriteStream(filepath)

    const sumSize = +response.headers['content-length']! || 0
    response.on('data', (chunk: Buffer) => {
      receive += chunk.length
      progressFn && progressFn(chunk.length, receive, sumSize)
    })

    response.pipe(writeStream).on('close', () => {
      endFn && endFn(filepath)
    })
  })
  return thisArg
}

// 调用示例
downloadByUrl(sourceUrl, 'test.image')
  .progress((current, receive, sum) => {
    console.log(receive, ((receive / sum) * 100).toFixed(2), '%')
  })
  .end((filepath) => {
    console.log('file save:', filepath)
  })
重定向处理
部分资源在对外直接暴露时,可能是一个短链,此时就需要做重定向处理
重定向的状态码常见301和302,当然还有其它的3开头的这里不赘述
除了状态码,重定向的目标url由response.headers.location表示
这里稍微改造一下之前的代码,添加一个重定向逻辑即可
// 通过url 简单区分一下 资源是 https 还是 http
const _http = url.startsWith('https') ? https : http
_http.get(
  url,
  {
    // 添加一个UA,避免404
    // 部分短链服务网站没有UA会响应404
    headers: {
      'User-Agent': 'node http module'
    }
  },
  (response) => {
    const { statusCode } = response
    // 判断状态码是否3开头
    if (Math.floor(statusCode! / 100) === 3) {
      // 且存在 location
      if (response.headers.location) {
        // 递归
        downloadByUrl(response.headers.location, filename)
          // 透传事件
          .progress(progressFn)
          .end(endFn)
        return
      }
      // 不存在抛出错误
      throw new Error(
        `url:${url} status ${statusCode} without location header`
      )
    }
  }
)
为了防止无限重定向,还需要加个次数限制,再简单改造一下上述代码,添加一个配置属性作为入参
interface Options {
  filename: string
  maxRedirects: number
}
function downloadByUrl(url: string, option?: Partial<Options>) {
  const ops: Options = { filename: randomName(), maxRedirects: 10, ...option }
  // 省略一些重复代码
  _http.get(
    url,
    (response) => {
      const { statusCode } = response
      if (Math.floor(statusCode! / 100) === 3 && ops.maxRedirects) {
        ops.maxRedirects -= 1
        // 递归调用
        if (response.headers.location) {
          downloadByUrl(response.headers.location, ops)
          return
        }
      }
    }
  )
  return thisArg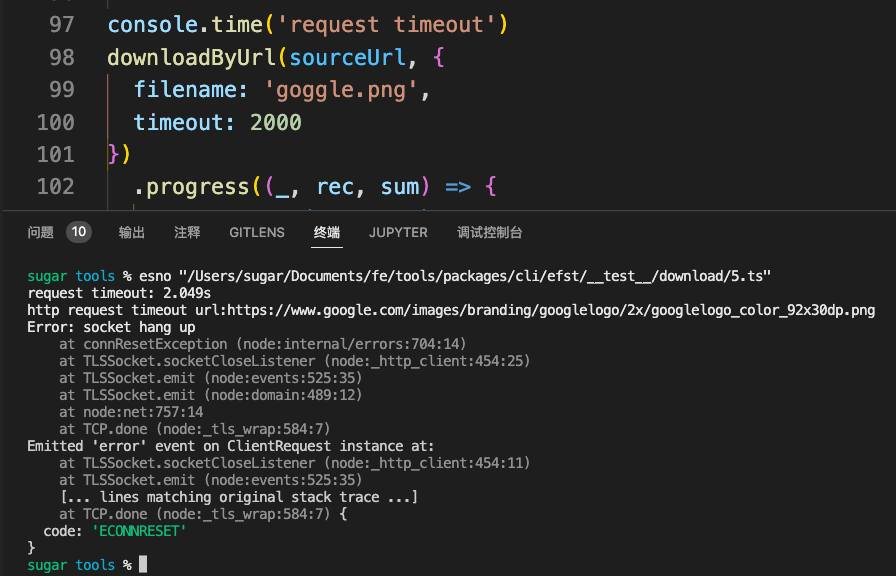
}请求超时
部分资源由于网络原因可能出现超时,为了避免长时间无反馈等待,可以设置超时时间
http模块支持timeout属性设置
// 接着之前的例子修改部分代码即可
const request = _http.get(
url,
{
// 设置超时时间,单位ms
timeout: ops.timeout || 300000,
},
(response) => {
// 省略response 逻辑
}
)
request.on('timeout', () => {
// 中断请求,输出错误
request.destroy()
console.error(`http request timeout url:${url}`)
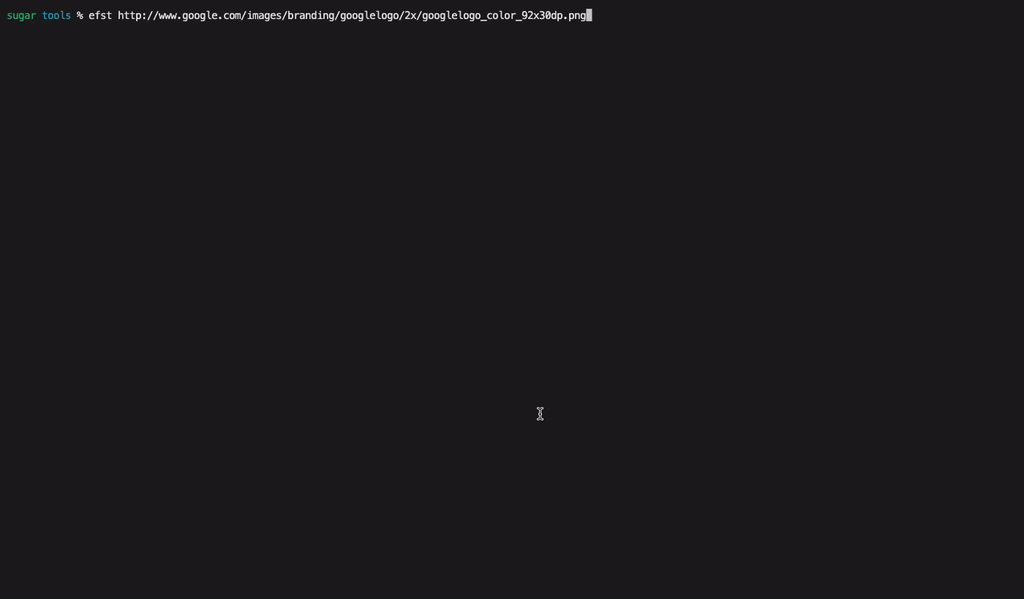
})下面是请求 google logo 失败示例
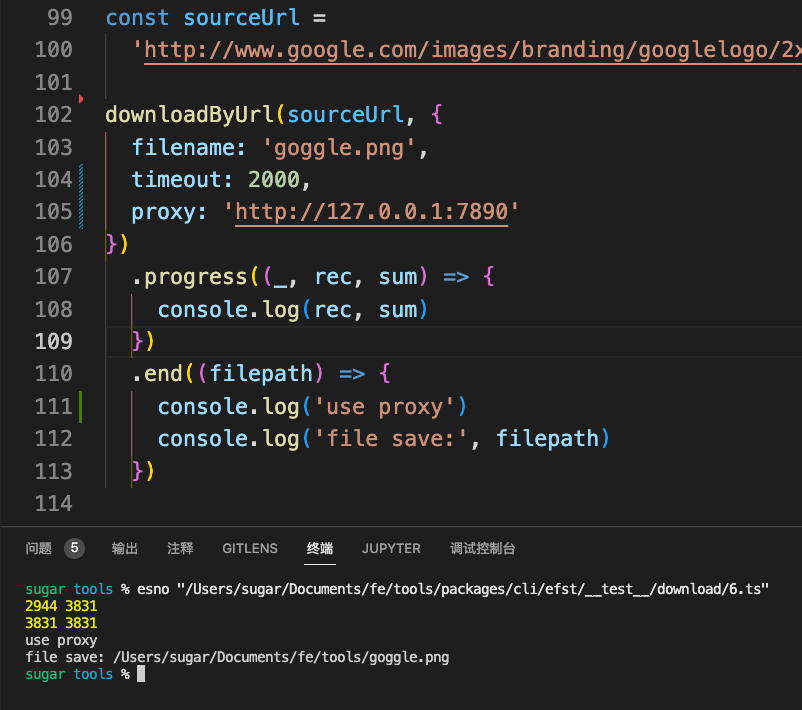
Proxy
部分资源访问不顺畅的时候,通常会走服务代理(🪜)
以谷歌的logo资源链接https://www.google.com/images/branding/googlelogo/2x/googlelogo_color_92x30dp.png
要让前面的方法downloadByUrl顺利执行,就需要其走代理服务
为http模块添加代理也非常简单,原生提供了一个agent参数,可用于设置代理
import http from 'http'

const request = http.get(url,{
  agent: Agent,
})这个Agent的构造可以直接用社区已经封装好的http-proxy-agent
const HttpProxyAgent = require('http-proxy-agent')

const proxy = new HttpProxyAgent('http://127.0.0.1:7890')在调用时只需将这个proxy实例传入即可
http.get(url, {
  agent: proxy
})原有的方法只需要添加一个proxy入参即可,
const request = _http.get(url, {
  agent: ops.proxy ? new HttpProxyAgent(ops.proxy) : undefined,
})
下面是使用代理成功请求的示例
合法文件名生成
文件下载到本地肯定需要有个名字,如果用随机的或者用户手动输入那肯定体验较差
最常见的就是通过url的pathname生成
比如上面的谷歌图片资源,咱们使用URL构造出一个示例,查看url的构成
new URL(sourceUrl)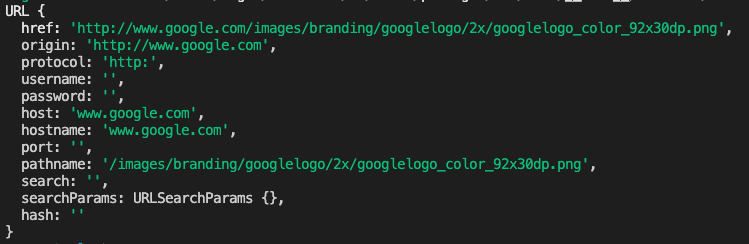
文件名就可以取pathname最后一截,通过path.basename即可获取
import path from 'path'

const url = new URL('http://www.google.com/images/googlelogo_color_92x30dp.png')
const filename = path.basename(url.pathname) // googlelogo_color_92x30dp.png当然文件名也可能会重复,再非覆盖写入的前提下,通过会在文件名后添加"分隔符+数字",比如x.png,x_1.png,x 1.png
提取文件名与后缀可以用path.parse直接获取
import path from 'path'

// { ext: '.png', name: 'google' }
path.parse('google.png')

// { ext: '', name: 'hashname' }
path.parse('hashname')

// { ext: '.ts', name: 'index.d' }
path.parse('index.d.ts')

// { ext: '.', name: 'index' }
path.parse('index.')

// { ext: '', name: '.gitkeep' }
path.parse('.gitkeep')
但是针对带有多个 . 的文件名不太友好,比如.d.ts是期望被当做完整的ext处理
所以咱们可以对其简单递归包装一下实现1个nameParse,确保最后parse(input).name === input即可
function nameParse(filename: string, suffix = '') {
  const { name, ext } = path.parse(filename)
  if (name === filename) {
    return { name, ext: ext + suffix }
  }
  return nameParse(name, ext + suffix)
}
下面是运行示例
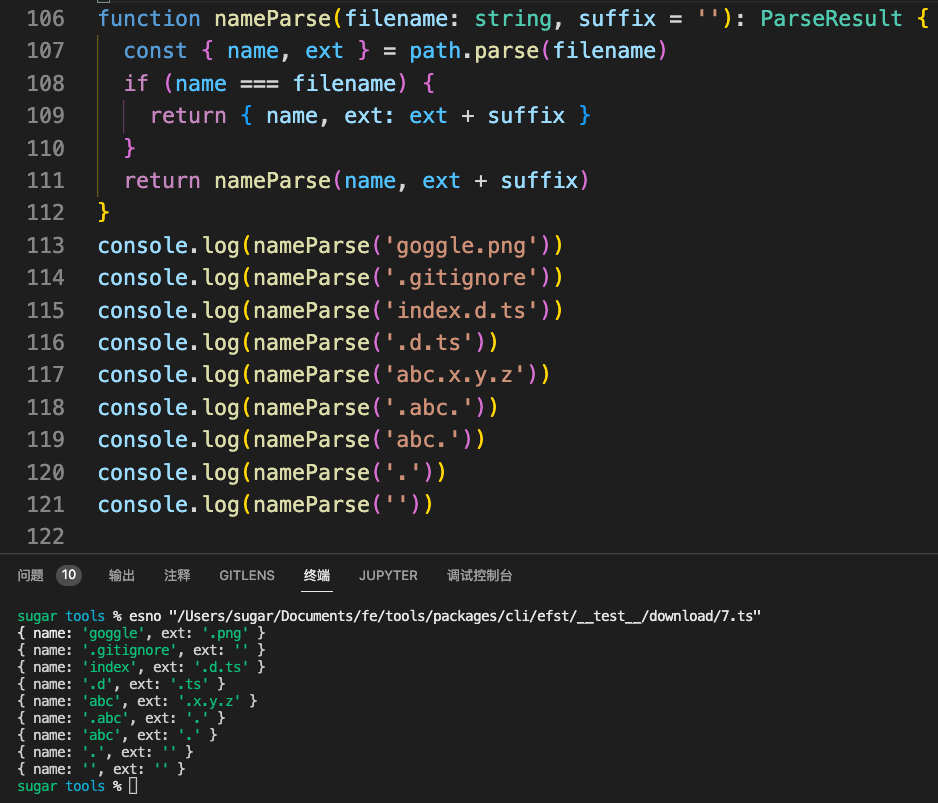
到此完成了name和ext的分离
文件名分离后简单进行一下name的合法性替换,避免出现操作系统不支持的字符
正则来自于Google
function normalizeFilename(name: string) {
  return name.replace(/[\\/:*?"<>|]/g, '')
}再做文件名去重只需要给name添加后缀数字即可
url上的内容还可能存在encode的情况,比如掘金.png => encode => %E6%8E%98%E9%87%91.png
因此咱们在处理从pathname提取的filename前先进行必要的decode
decodeURIComponent('%E6%8E%98%E9%87%91.png') // 掘金.png有了前面的准备工作咱们就可以组装出一个从url提取合法可用的文件名的方法嘞
function getValidFilenameByUrl(url: string) {
  const urlInstance = new URL(url)
  return decodeURIComponent(path.basename(urlInstance.pathname))
}
getValidFilenameByUrl('http://a/b/c.png?width=100&height') // c.png
然后是获取不重复的文件路径
function getNoRepeatFilepath(filename: string, dir = process.cwd()) {
  const { name, ext } = nameParse(filename)
  let i = 0
  let filepath = ''
  do {
    filepath = path.join(dir, `${name}${i ? ` ${i}` : ''}${ext}`)
    i += 1
  } while (fs.existsSync(filepath))
  return filepath
}最后集成到downloadByUrl方法中,使输出的文件名可控
// ...code
const filename = normalizeFilename(
  ops.filename || getValidFilenameByUrl(url) || randomName()
)
const filepath = ops.override
  ? path.resolve(filename)
  : getNoRepeatFilepath(filename)

const writeStream = fs.createWriteStream(filepath)

// ...code
测试案例运行结果如下

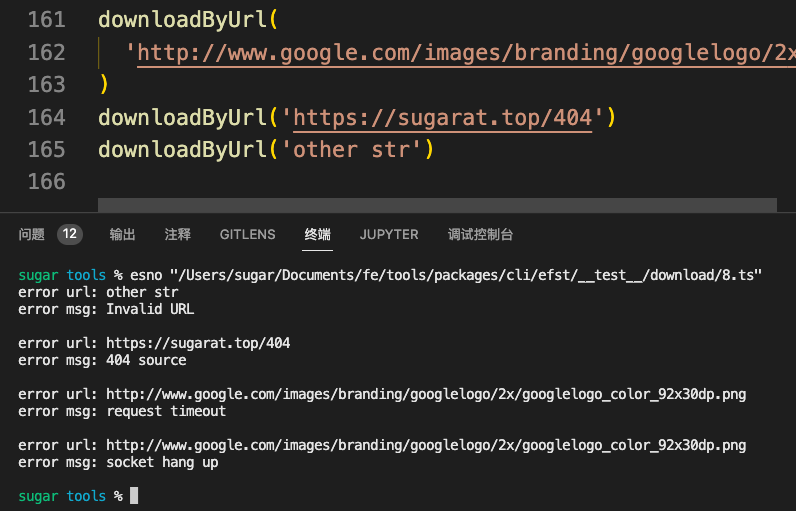
异常错误情况处理
对于非法的url,资源不存在通常会响应404等没考虑到的异常场景
可以在上述的downloadByUrl方法中拓展1个error方法,用于错误处理
let request: http.ClientRequest

let errorFn = (err, source) => {
  console.log('error url:', source)
  console.log('error msg:', err.message)
  console.log()
}

const responseCallback = (response: http.IncomingMessage) => {
  const { statusCode } = response
  // 404
  if (statusCode === 404) {
    request.emit('error', new Error('404 source'))
    return
  }
}

// ...code
try {
  request = _http.get(url, reqOptions, responseCallback)
  request.on('error', (err) => {
    request.destroy()
    errorFn && errorFn(err, url)
  })
  request.on('timeout', () => {
    request.emit('error', new Error('request timeout'))
  })
} catch (error: any) {
  setTimeout(() => {
    errorFn && errorFn(error, url)
  })
}除特殊情况外,统一用request.on('error')处捕获错误
下面是示例代码及运行结果
封装CLI
上一小节阐述了功能的核心实现方法,此部分将上述能力集成到CLI中,方便对外分享与使用。
Options定义
import { Command } from 'commander'
const program = new Command()

program
  .argument('<url>', 'set download source url')
  .option('-f,--filename <filename>', 'set download filename')
  .option('-L,--location <times>', 'set location times', '10')
  .option('-t,--timeout <timeout>', 'set the request timeout(ms)', '3000')
  .option('-p,--proxy <proxy server>', 'set proxy server')
  .option('-o,--override', 'override duplicate file', false)
  .action(defaultCommand)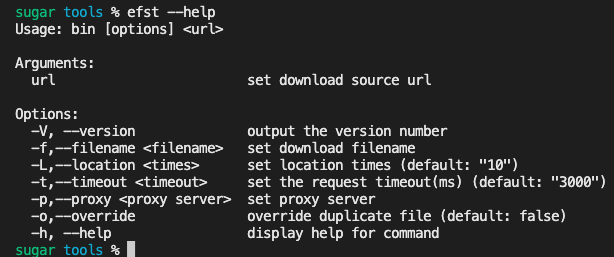
参数转换传递
下面是defaultCommand的逻辑,只需要将相关参数处理后透传给定义的download方法即可
option 不支持 number 所以需要对数字字符串做一下显示转换
export default function defaultCommand(url: string, options: CLIOptions) {
  const { filename, location, timeout, proxy, override } = options
  downloadByUrl(url, {
    maxRedirects: +location,
    timeout: +timeout,
    proxy,
    override,
    filename
  })
    .error((err) => {
      console.log('error url:', url)
      console.log('error msg:', redStr(err.message))
      process.exit()
    })
    .end((filepath) => {
      console.log('file save:', underlineStr(yellowStr(filepath)))
    })
}
下面是使用演示
下载进度展示
小文件还能无感等待,大文件咱就得整个进度条来显示了,方遍了解进度。
在npm中检索,除了推荐了老牌库 progress,还看到了1个 cli-progress
咱们这里就用后者(最近更新时间看着近一些)
最简单的示例与结果如下
import cliProgress from 'cli-progress'

const progressBar = new cliProgress.SingleBar({})
downloadByUrl(url)
  .progress((cur, rec, sum) => {
    // 初始化
    if (progressBar.getProgress() === 0) {
      progressBar.start(sum, 0)
    }

    // 更新进度
    progressBar.update(rec)

    // 结束
    if (rec === sum) {
      progressBar.stop()
    }
  })
展示内容过于简单,可以自定义一下显示,展示文件大小和下载速度,参考文档,结合内置的一些值设定初始化如下
const format = '[{bar}] {percentage}% | ETA: {eta}s | {rec}/{sum} | Speed {speed}'

const progressBar = new cliProgress.SingleBar(
  {
    format,
    barsize: 16
  },
  cliProgress.Presets.shades_classic
)紧接着是start时设置sum和speed默认值
// 初始化的时候计算总大小
progressBar.start(sum, 0, {
  sum: formatSize(sum)
})

// 过程中更新进度
progressBar.update(rec, {
  rec: formatSize(rec),
  speed: speed(cur)
})formatSize方法实现如下(来源于谷歌推荐代码),短小精悍的代码,将B转换为其它单位展示。
export function formatSize(
  size: number,
  pointLength?: number,
  units?: string[]
) {
  let unit
  units = units || ['B', 'K', 'M', 'G', 'TB']
  while ((unit = units.shift()) && size > 1024) {
    size /= 1024
  }
  return (
    (unit === 'B'
      ? size
      : size.toFixed(pointLength === undefined ? 2 : pointLength)) + unit!
  )
}

formatSize(1234) // 1.21K
formatSize(10240) // 10.00K
计算下载速度
speed方法实现如下
- 使用闭包
- 一段时间计算一次速度(1000ms / 时间周期 * 周期内下载量B)
/**
 * @param cycle 多久算一次(ms)
 */
function getSpeedCalculator(cycle = 500) {
  let startTime = 0
  let endTime = 0
  let speed = 'N/A' // 记录速度
  let sum = 0 // 计算之前收到了多少B

  return (chunk: number) => {
    sum += chunk
    if (startTime === 0) {
      startTime = Date.now()
    }
    endTime = Date.now()
    // 计算一次
    if (endTime - startTime >= cycle) {
      speed = `${formatSize((1000 / (endTime - startTime)) * sum)}/s`
      startTime = Date.now()
      sum = 0
    }
    return speed
  }
}

// 获取到计算速度的方法
const speed = getSpeedCalculator()

setTimeout(speed, 200, 4000)
setTimeout(speed, 300, 5000)
setTimeout(speed, 1000, 10240)
setTimeout(() => {
  console.log(speed(0)) // 23.49K/s
}, 1100)
优化后的下载效果如下

持久化配置存储
像proxy,timeout参数不希望每次都设置,就需要将这些配置存起来,下次直接读取。
通常的CLI工具都会在/Users/$username/.xxx目录中存放自己的配置文件,即HOME目录下。
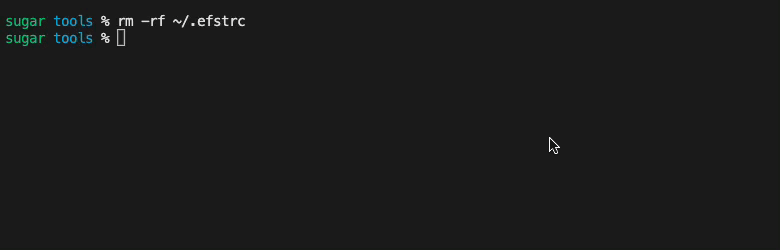
同理我们可以开辟一个文件存放.efstrc,process.env.HOME即可获取到HOME目录,process.env.USERPROFILE用于兼容win32平台。
const configPath = path.join(
  process.env.HOME || process.env.USERPROFILE || process.cwd(),
  '.efstrc'
)读写配置实现如下,利用Array.prototype.reduce方法在遍历的过程中做存取值操作
- 支持多级的key的读写
- 兼容异常场景,返回空或空对象
function getCLIConfig(key = '') {
  try {
    const value = JSON.parse(fs.readFileSync(configPath, 'utf-8'))
    return !key
      ? value
      : key.split('.').reduce((pre, k) => {
          return pre?.[key]
        }, value)
  } catch {
    return !key ? {} : ''
  }
}

function setCLIConfig(key: string, value: string) {
  if (!key) {
    return
  }
  const nowCfg = getCLIConfig()
  // 支持传入多级的key
  const keys = key.split('.')

  // 遍历设置的所有都配置都与nowCfg直接或间接的进行了引用关联
  keys.reduce((pre, k, i) => {
    // 赋值
    if (i === keys.length - 1) {
      pre[k] = value
    } else if (!(pre[k] instanceof Object)) {
      pre[k] = {}
    }
    return pre[k]
  }, nowCfg)

  // 输出到文件
  fs.writeFileSync(configPath, JSON.stringify(nowCfg, null, 2))
}

setCLIConfig('proxy', 'http://127.0.0.1:7890')
setCLIConfig('timeout', '2000')
setCLIConfig('github.name', 'ATQQ')
setCLIConfig('github.info.url', 'https://github.com/ATQQ')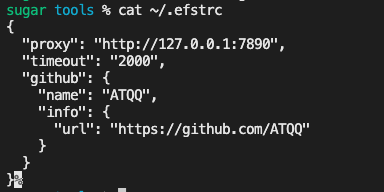
再添加一个移除配置的方法,与设置的的方法类似只是使用delete操作符删除相关的key
function delCLIConfig(key: string) {
  if (!key) {
    return
  }
  const nowCfg = getCLIConfig()
  const keys = key.split('.')
  keys.reduce((pre, k, i) => {
    // 移除
    if (i === keys.length - 1) {
      delete pre[k]
    }
    return pre[k] instanceof Object ? pre[k] : {}
  }, nowCfg)
  fs.writeFileSync(configPath, JSON.stringify(nowCfg, null, 2))
}

delCLIConfig('timeout')
delCLIConfig('github.info.name')
delCLIConfig('github.name')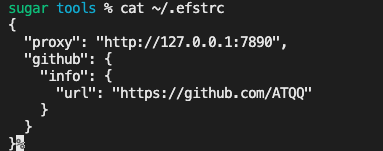
有了这3个方法支撑就可以封装成一个config指令用于配置的CRUD
config指令实现
先是定义
program
  .command('config <type> <key> [value]')
  .alias('c')
  .description('crud config <type> in [del,get,set]')
  .action(configCommand)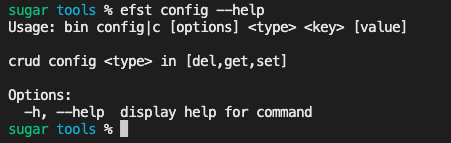
configCommand封装实现,将上述实现的方法按场景放入即可
export type ConfigType = 'set' | 'get' | 'del'

function defaultCommand(
  type: ConfigType,
  key: string,
  value: string
) {
  if (type === 'set') {
    setCLIConfig(key, value)
  }
  if (type === 'del') {
    delCLIConfig(key)
  }
  if (type === 'get') {
    console.log(getCLIConfig(key) || '')
  }
}
使用演示如下
config 指令这部分逻辑完全可以分离成一个通用的 commander 模块,在需要的CLI里直接注册即可,简化后大概如下
import { Command } from 'commander'
const program = new Command()

registerConfigCommand(program,'.efstrc')
最后
笔者对这个工具的想法还有很多,后续先把功能🐴出来再写续集,本文就先到这里。
内容有不妥的之处,还请评论区斧正。
CLI完整源码见GitHub